Kumi-Bead Necklace
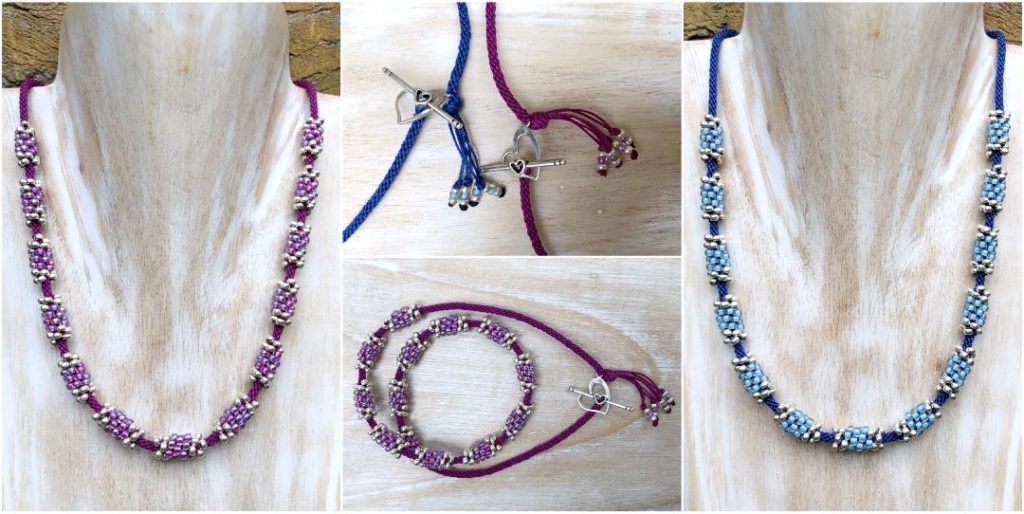
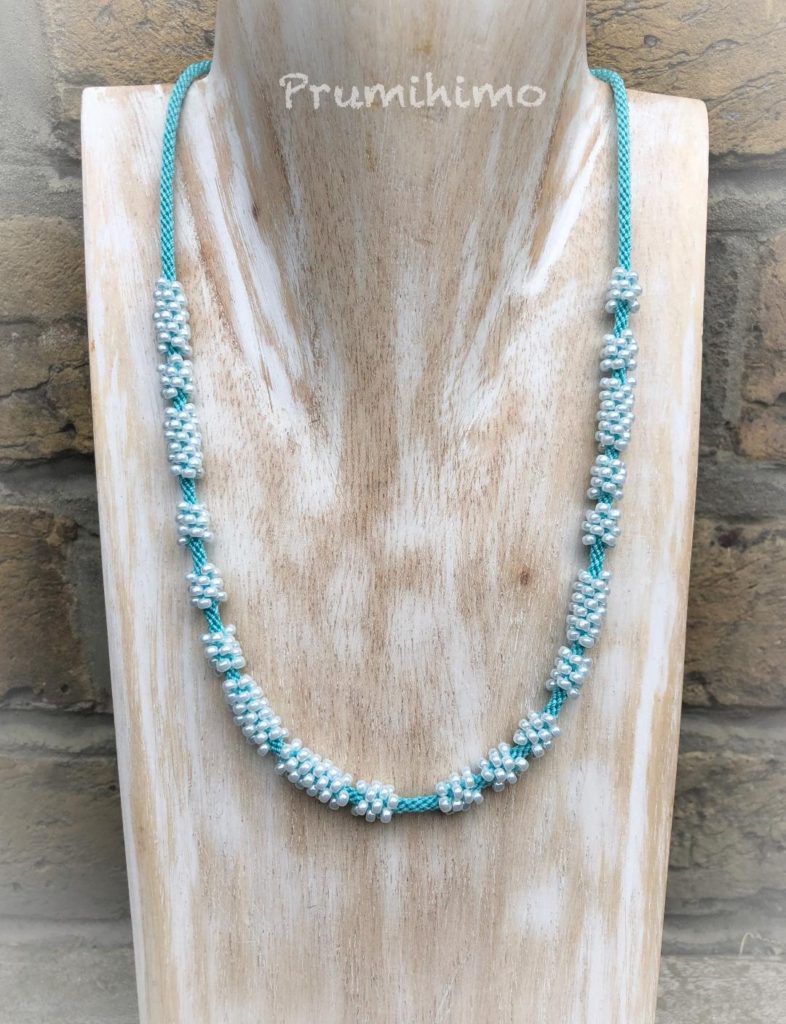
This necklace tutorial was designed and written when I was asked to supply a kumihimo tutorial for a facebook group that was running a special kumihimo event. I wanted to encourage new braiders, so I wanted the design to require the barest minimum of materials and I also wanted to offer a very easy ending method. For this necklace all you need is cord, size 8 beads in 2 colours and a toggle clasp.
Materials
8 metres/9 yards beading cord, 0.5mm/Tex 210/#18 (S-Lon magenta or royal blue)
1 toggle clasp
10g seed beads, size 8, colour A (Miyuki silver duracoat galvanised)
10g seed beads, size 8 colour B (Miyuki raspberry lined crystal AB or pale blue lined crystal AB)
A drop of clear glue or nail polish
Equipment
1 round kumihimo disk, large or small
50g/1-2oz kumihimo weight, or a bag of coins to this weight
8 kumihimo bobbins (optional)
Size – These instructions will make a necklace of approximately 46cm/18 inches. For a longer necklace use longer lengths of cord and braid for longer before and after the beaded sections. Alternatively add more beaded sections.
Note about the disk – The numbers on the disk are not required for this tutorial. For clarity the disks shown in this tutorial have been flipped over and equally spaced dots have been marked in the north, south, east and west positions. This is not essential, but I recommend this method because it is a good way to keep track of the cord movements around the disk.
Note about bobbins – When working with long cords they can easily become tangled, so it is helpful to wind the excess cord onto the bobbins to avoid knots. If you do not use bobbins you need to run your hands down the cords after every few moves. To keep the beads on the cords thread on a size 6 seed bead and pass the cord through the bead again in the same direction. You will be able to move this bead up and down the cord so that you can keep the beads close to the disk and also be able to release more cord as necessary.
Stiffening the cords – Threading beads onto the cords and threading the cords through the clasp is made easier if you stiffen the ends of the cords first. Several products can be used for this purpose, but for all of them remember to be sparing with the product or the cords will absorb it and widen. Clear nail polish, brush on superglue or a fray prevention product, such as Fraycheck, are perfect for this purpose. Allow the cords to dry and stiffen before using them.
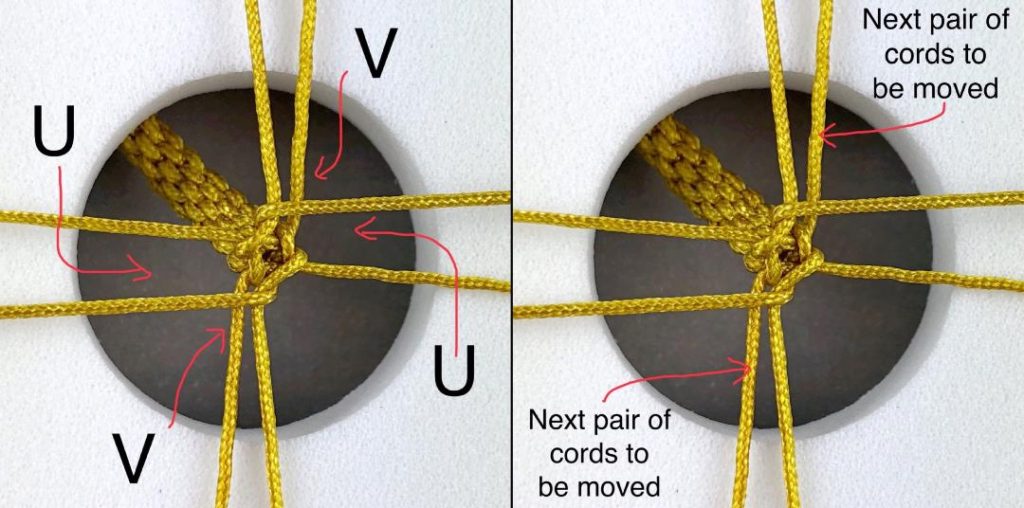
Where am I? – When you need to put your disk down, you need to know which cord to start with when you pick it up again. One method is to stop when you have performed the first cord move of the top down/bottom up moves and you have 3 cords together on one side. However, it is also important to be able to read the braid to be able to understand where you are. Look carefully at the point where the braid forms to identify which cord should be moved next. You should be able to see which two cords are on top and these are the last cords you moved. Turn the disk in either direction so that these cords are at the sides and you can continue to braid as usual with the cords that are now at the top and bottom of the disk. Another method is to look at the shape created by the cords, as shown in the photos below, to identify which cords to move next.
Before you start – Please remember that good tension is the key to successful kumihimo. Even tension is achieved in the following ways:
- Use a new disk which has not been used for wider cords because they are likely to have stretched the slots
- Keep the cords tight across the face of the disk
- Keep the point of braiding level with the face of the disk
- Keep the disk level when braiding
- Allow the weight to dangle freely and move it up the braid as the braid grows
Further guidance and advice about tension can be found in this YouTube video
Top 5 tension tips for kumihimo – https://youtu.be/xj4_kY0fqMQ
Instructions
- Cut the beading cord into 4 lengths of 2 meters/80 inches. Thread the cords through the bar part of the clasp and centre the bar on the cords.
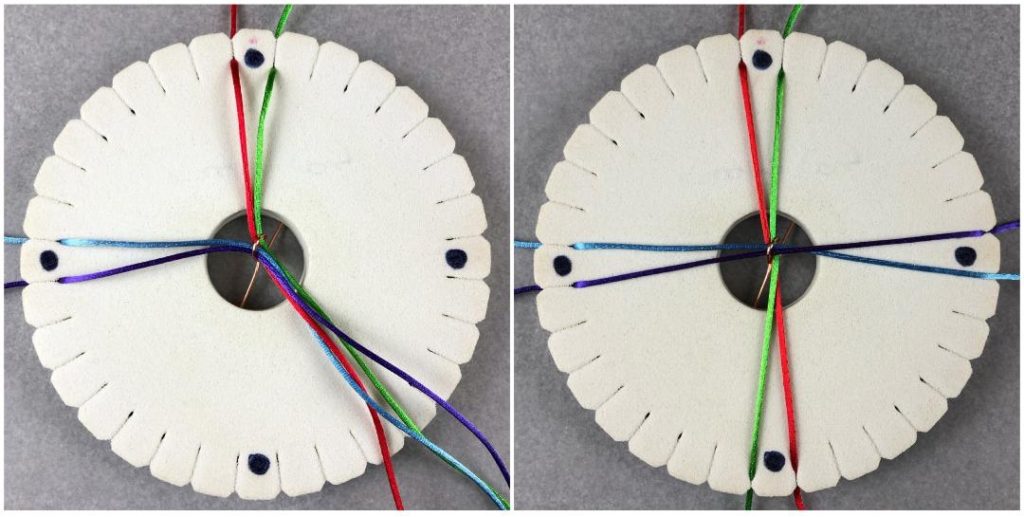
- Hold the bar in the middle of the hole in the disk and position the cords on both sides of the dots in the north, south, east and west positions. It is best to position each cord in diagonally opposite slots, as shown by the coloured cords in the photo. Check that all the cords are still the same length. If you are using bobbins wind the excess cord onto the bobbins.
- Start to braid (if you are a complete beginner please watch this YouTube video, Braiding on the round kumihimo disk – https://youtu.be/kdBerLxDcuU). For the first few moves you need to braid very carefully to make sure that you do not pull too hard on the cords, making them uneven. You may need to hold the bar to keep it in the middle of the hole. After a few moves the weight can be attached to the bar. Braid for 9cm/3.5 inches. As you braid the cords move around the disk. Stop braiding at the point where the cords are back in the starting positions on each side of the dots.
- Each beaded section is made up of 4 beads. I recommend starting by threading on the beads for just the first beaded section. On each cord thread on,
1 size 8 seed bead, colour A
2 size 8 seed beads, colour B
1 size 8 seed bead, colour A
- Continue to braid, adding in a bead each time a cord is moved until the beads are used up. Make sure you are starting with the correct cords and check the advice above if you are unsure. (If you are a complete beginner please watch this YouTube video, Braiding with beads on the round kumihimo disk – https://youtu.be/15ZWqmNkrFA). The cords should now be back on each side of the dots.
- To create an even gap between the beaded sections now braid without beads until the cords are again back on each side of the dots. If you prefer to count the moves, this is 32 individual cord moves.
- The rest of the necklace is created in the same way as the last 3 steps. A beaded section is followed by a plain section and for each section you start and finish when the cords are on the dots. You now have a choice of how to thread on the rest of the beads. Either – Thread on the beads for each section at a time. Add them into the braid and then braid without beads to create the unbeaded section. Using this method makes it easier to keep track of where you are, but if you are using bobbins it will involve a lot of winding and unwinding of cord.
For each of 12 more beaded sections thread the following beads onto all 8 cords,
1 size 8 seed bead, colour A
2 size 8 seed beads, colour B
1 size 8 seed bead, colour A
Or -Thread all of the rest of the beads onto the cords. This method is faster if you are using bobbins because there is less winding, but you need to keep a careful eye on where you are and not add in too many beads for each section.
Thread 48 beads in the following pattern onto all 8 cords
1 size 8 seed bead, colour A
2 size 8 seed beads, colour B
2 size 8 seed beads, colour A
2 size 8 seed beads, colour B
2 size 8 seed beads, colour A
2 size 8 seed beads, colour B
2 size 8 seed beads, colour A
2 size 8 seed beads, colour B
Repeat until there are 47 beads on the cord and finish with 1 size 8 seed bead, colour A
- Continue to braid, adding in the beads and creating the gaps in between the beaded sections until all the beads are used up.
- Braid without beads for a further 9cm/3.5 inches to match the first part of the necklace.
- Lift one cord from the disk and thread on the second part of the clasp. Return the cord to its slot. Lift the next cord in either direction and thread it through the clasp, before returning it to its slot. Lift the next cord in the same direction and thread it through the clasp, before returning it to its slot. If possible thread the next cord through as well, so that half the cords are threaded through the clasp and return the cord to its slot. (If only 2 or 3 cords will fit through the clasp it will still be firmly attached to the braid)
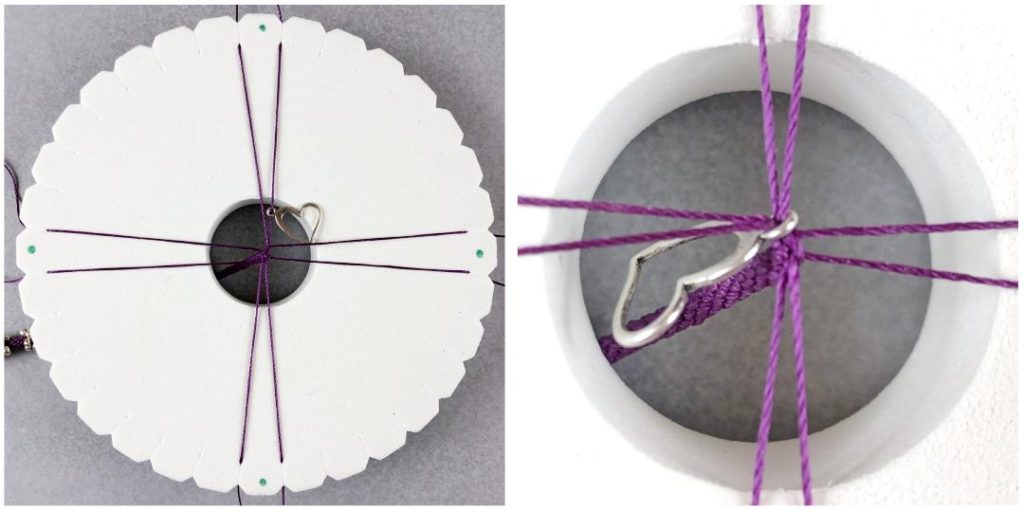
- Continue to braid for approximately 0.5cm / 0.25inch. Pinch the braid from underneath the disk to prevent unravelling, remove it from the disk and quickly tie an overhand knot. As you tighten the knot push it as close as possible to the clasp. You may find it helpful to watch the following YouTube video where I demonstrate this technique and how to make the tassel.
Kumihimo bookmark – https://youtu.be/w3OU2zfPw_Q
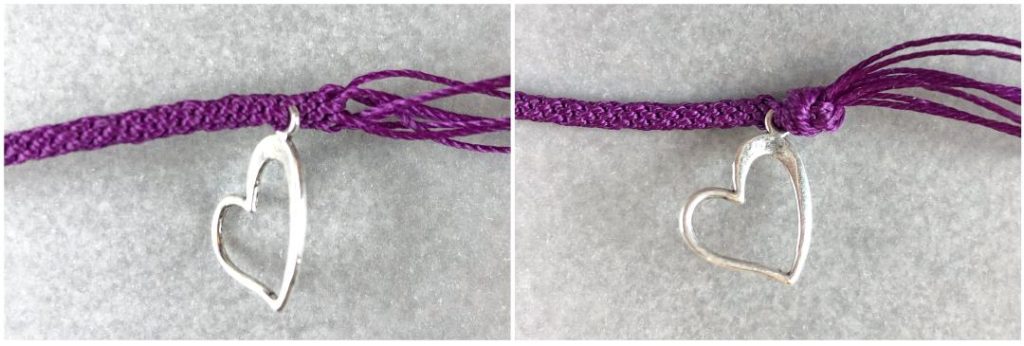
- To make the tassel take 2 cords and tie an overhand knot approximately 2.5cm/1 inch from the clasp. Thread a few seed beads onto both cords, separate the cords and tie a double knot. Repeat for the rest of the cords. If you find it difficult to thread both cords through the beads you can use the cords individually instead of in pairs.
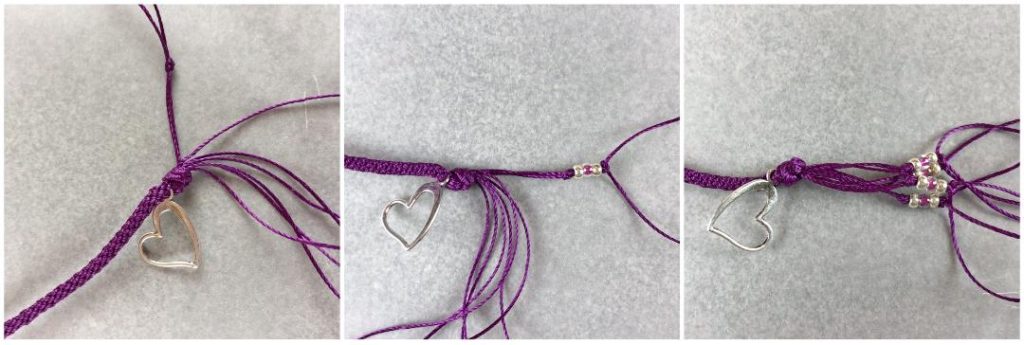
- There are two ways to finish off the cord ends.
- Either – Seal the final knot with glue and trim the cords close to the knot
- Or – Trim the cords 1mm from the knot and use a naked flame to melt the cord so that it forms a blob close to the knot. Seal the knot with glue.
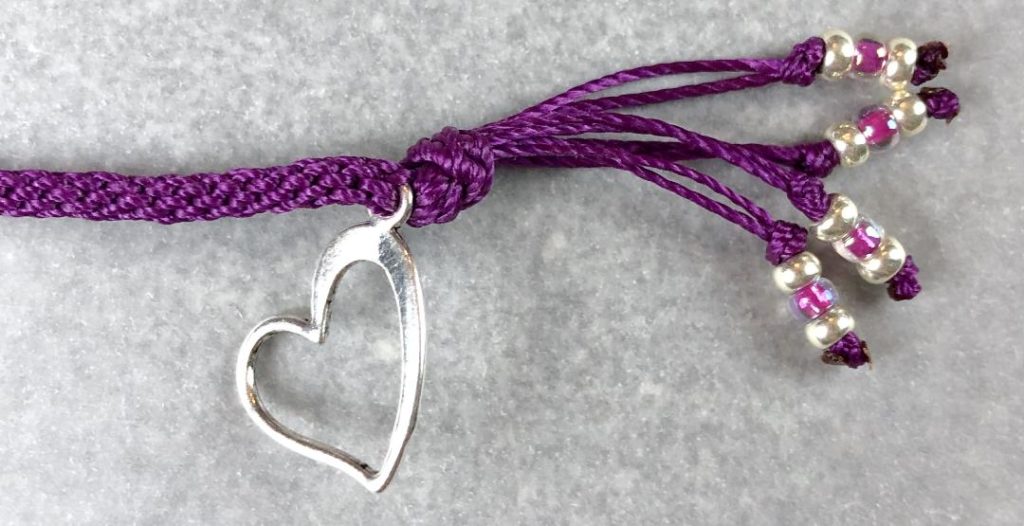
NB Be very careful when melting the cord and only use a flame before using glue, not after.
Other creative ways of finishing off your kumihimo can be found in my book, available from amazon or prumihimo.com – Kumihimo Endings – The finishing touch for every braid
Now you can play with different sized beads and different spacing. These necklaces can be worn singly or in multiples. Try loosely plaiting 3 together for a great effect.
The next set of instructions explain how to adapt the design to make a necklace with a secret message spelt out in beads using morse code. I strongly advise making the evenly spaced necklace above first because you will learn how to use the dots on the disk to ensure that the beads and gaps are evenly sized and spaced. If you have not made the original necklace you will find the instructions below very hard to follow. For this necklace you will be working out your own pattern and you will need to concentrate as you braid to ensure that you are making the gaps and the beaded sections the correct size.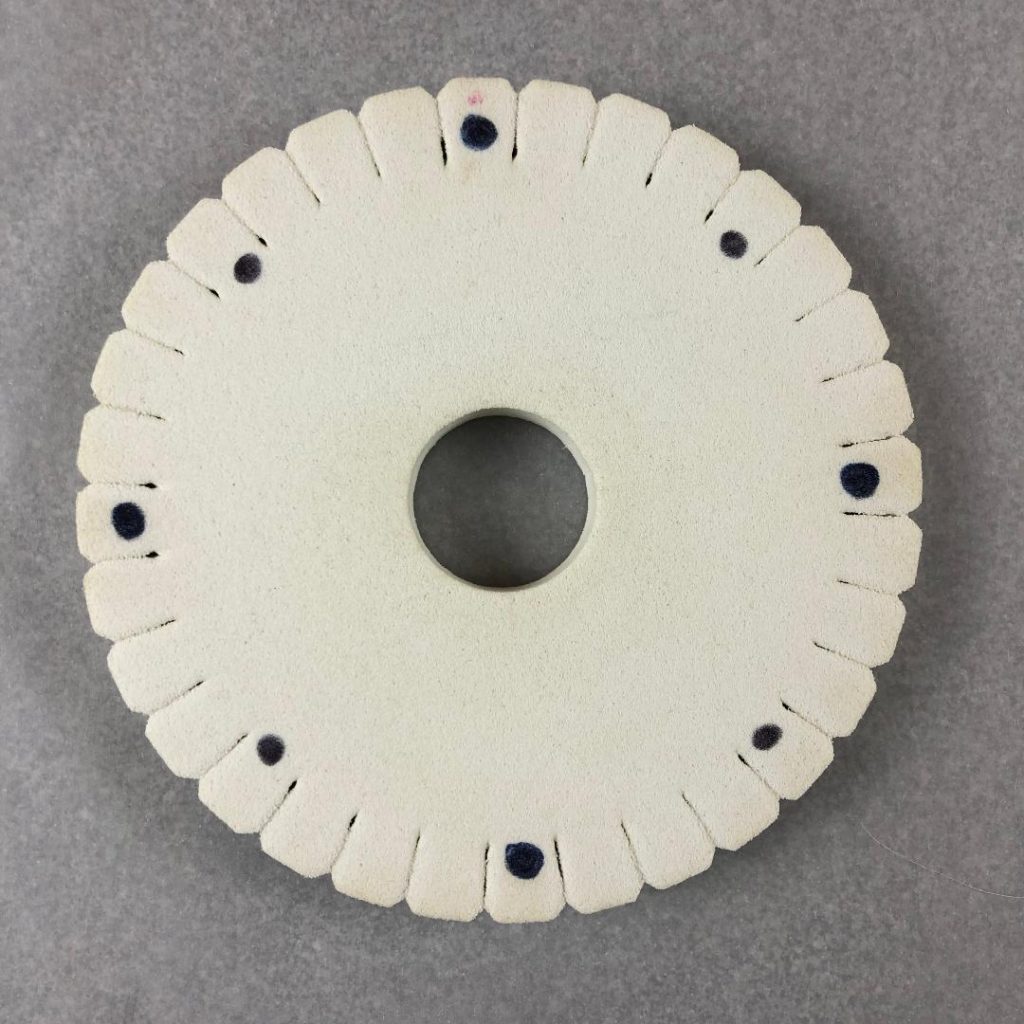
Morse Code Necklace
For this necklace the dot to dot method of braiding is used, but you will need to mark extra dots on your disk, so that you can create smaller gaps. You will need 8 evenly spaced dots, so mark on the extra dots exactly in the middle between the dots you have already marked.
The morse code dots are represented by small braided beads, made up of 2 beads on all 8 cords, which adds up to 16 beads. When you braid them, you start on the dots and you will finish on the next set of dots. Alternatively, you can count the 16 beads as you braid them.
The dashes are represented by longer braided beads, made up of 4 beads on all 8 cords, which adds up to 32 beads. When you braid them, you start on the dots and you carry on braiding past the next set of dots and finish on the following dots. Alternatively, you can count the 32 beads as you braid them.
To start making the necklace carry out the steps 1-3 above. The length of plain braid required will depend on the length of your word or words. To give you a rough idea, on my braid the word HOPE measured 16cm and the words KEEP SAFE measured 28cm. Make sure you stop when the cords are on either side of the dots. The cord allowance in the tutorial should be enough for Hope or Keep Safe, but longer words or messages will require more cord. It is difficult to work out exactly how much cord you may need, so be generous!
Work out how many beads you will require for each cord, using the code below:
Morse Code
A = Dot Dash
B = Dash Dot Dot Dot
C = Dash Dot Dash Dot
D = Dash Dot Dot
E = Dot
F = Dot Dot Dash Dot
G = Dash Dash Dot
H = Dot Dot Dot Dot
I = Dot Dot
J = Dot Dash Dash Dash
K = Dash Dot Dash
L = Dot Dash Dot Dot
M = Dash Dash
N = Dash Dot
O = Dash Dash Dash
P = Dot Dash Dash Dot

Q = Dash Dash Dot Dash
R = Dot Dash Dot
S = Dot Dot Dot
T = Dash
U = Dot Dot Dash
V = Dot Dot Dot Dash
W = Dot Dash Dash
X = Dash Dot Dot Dash
Y = Dash Dot Dash Dash
Z = Dash Dash Dot Dot
For example if you want to write the word HOPE it will work like this:
H = Dot Dot Dot Dot = 8 beads, O = Dash Dash Dash = 12 beads, P = Dot Dash Dash Dot = 12 beads, E = Dot = 2 beads Total = 34 beads for each cord
Thread on the beads.
Now for the spacing. To make it possible to read the morse code you need different spacing between dots/dashes, letters and words. To make sure they are regular the ‘dot to dot’ method is used.
For the gap between the dots and dashes you need a small gap, so braid from one set of dots to the next. I refer to this as dot to dot x 1. (16 individual cord moves)
For the medium gap between letters you need double that so you braid past the first set of dots to the second set. This is dot to dot x 2. (32 individual cord moves)
If you have more than one word you need to have a large gap between the words, so carry on to the following set of dots. This is dot to dot x 3. (48 individual cord moves)
So now let’s look at the example of HOPE again.
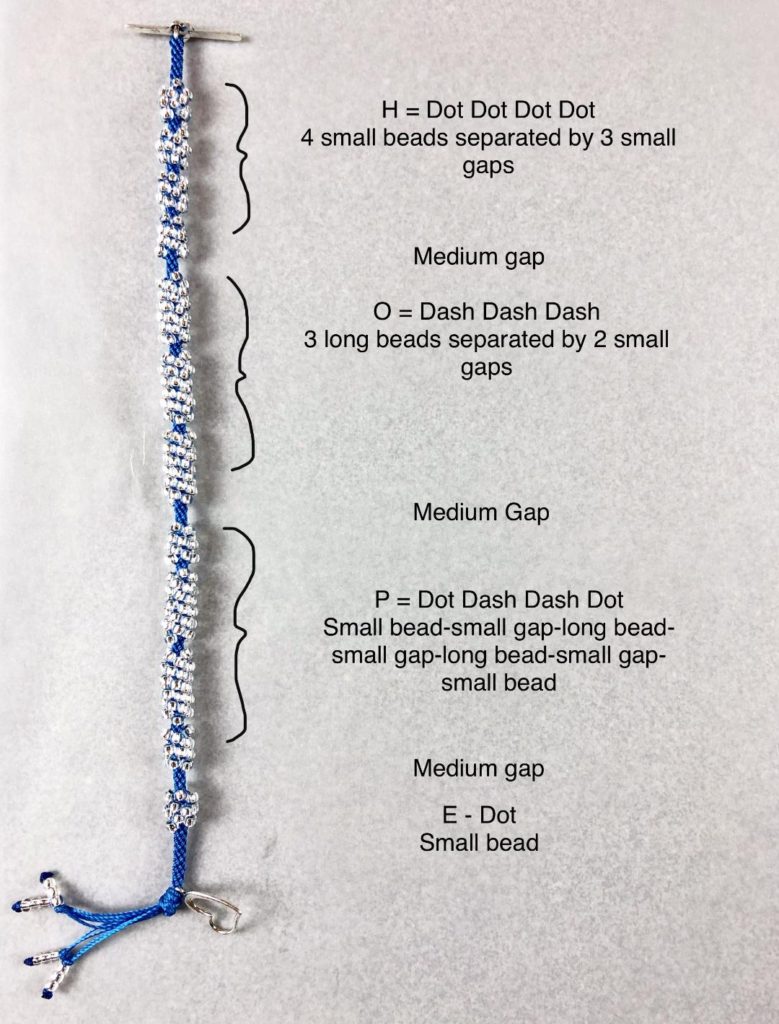
The necklace in the photo spells out KEEP SAFE
K = Dash Dot Dash
E = Dot
E= Dot
P = Dot Dash Dash Dot
S = Dot Dot Dot
A = Dot Dash
F = Dot Dot Dash Dot
E = Dot
Once you have done one I am sure you will want to make more necklaces or bracelets with secret messages. Names, uplifiting messages, thank you, merry Christmas etc. Have fun!
If you wish to share these instructions with friends please give them the link so they can visit this website themselves, rather than giving them a copy of the instructions. If you post pictures of what you have made please remember to give credit for the design to Pru McRae or Prumihimo.
Please remember that this tutorial is the original work of Pru McRae and is protected by international copyright law. It must not be copied, shared, sold or distributed in any way. It must not be taught without written permission from Pru McRae. If you wish to sell items made using this tutorial you are permitted to do so as long as the design is credited to Pru McRae.
Edit : I have been asked for a chart of morse code, so here it is.

