

I need to start this blog with a big thank you to three people. First to Ellen Welling, who introduced this technique to my Facebook group. Second to Monique Kooij, owner of the Limited Edition beadshop in The Hague, who taught the technique to Ellen. Third and most importantly, to the unknown person who originally had the idea of making this traditional knot on the kumihimo disk!
Knots tend to come from a variety of traditions and can therefore be given different names, depending on their historical origins and their popular use. The technique in question seems to have several variations and names, such as Box Knot, Crown Sinnet and Barrel Knot. The version used here has a spiral construction and is formed of consecutive knots tied in the same direction, which would suggest that it is usually called a Barrel Knot. However, there are other types of barrel knot, used in climbing and sailing, which causes confusion, so for the purpose of these instructions I will refer to it by the general name of Box Knot Braid. As a jewellery maker, my interest is less in the name or origin of a braid and more in how it can be used effectively to make jewellery. I have done a small amount of research into this technique and what attracts me is the way that it can be done so much more easily on the kumihimo disk than in any other instructions I have found. The reason for this is that the job of a kumihimo disk is to separate and identify different cords, so that a series of moves can be carried out. This is as useful for knot making as it is for braiding. I have been experimenting with the technique, using the instructions Ellen has kindly made available and there are a few minor enhancements I would like to pass on in this blog.
The box knot braid itself is attractive, but I do not find that it offers anything more than I can achieve with the basic kumihimo braids. I also find that the braiding process does not have the rhythm and flow which I find so wonderful about kumihimo. In fact, it is more fiddly and slower to construct. However, when beads are added the braid has its own very useful qualities, making it a great new addition to the braiders repertoire of skills.
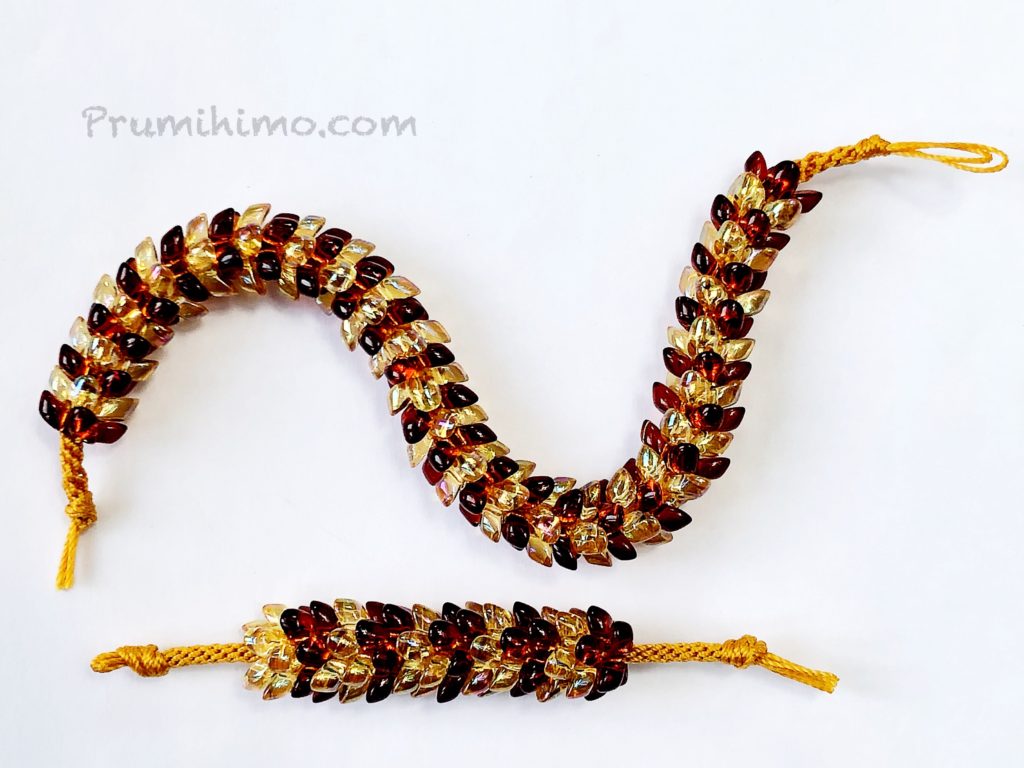
This photo shows a comparison between a box braid made with long magatama beads and a regular 8 cord round braid (Kongo Gumi) made with long magatamas. For both I threaded on an alternating pattern of gold and amber beads. The box braid is far more flexible and sinuous than the round braid and is more economical with the beads. For 5cm/2inches of braid the round braid required 80 beads, while the box braid required 60 beads. This makes the box braid a good choice for a necklace, for reasons of economy and the feel of the braid. For a chunky bracelet, with a firm, bangle-like shape, the round braid would be my preference.
If you want to have a go I strongly recommend trying the braid first without beads. This will enable you to understand the structure and ensure that you are able to get the tension right before you have a go with beads. Satin cord is always a good choice for learning a braid because its slippery surface makes it easy to tighten up cords evenly, but make sure you use an old disk for this. When you braid with beads you need to use thinner cord and the disk slots need to be tight enough to grip the cords firmly. In this blog I will give instructions and my tips for the braid without adding beads and in the next blog I will concentrate on beaded braids.
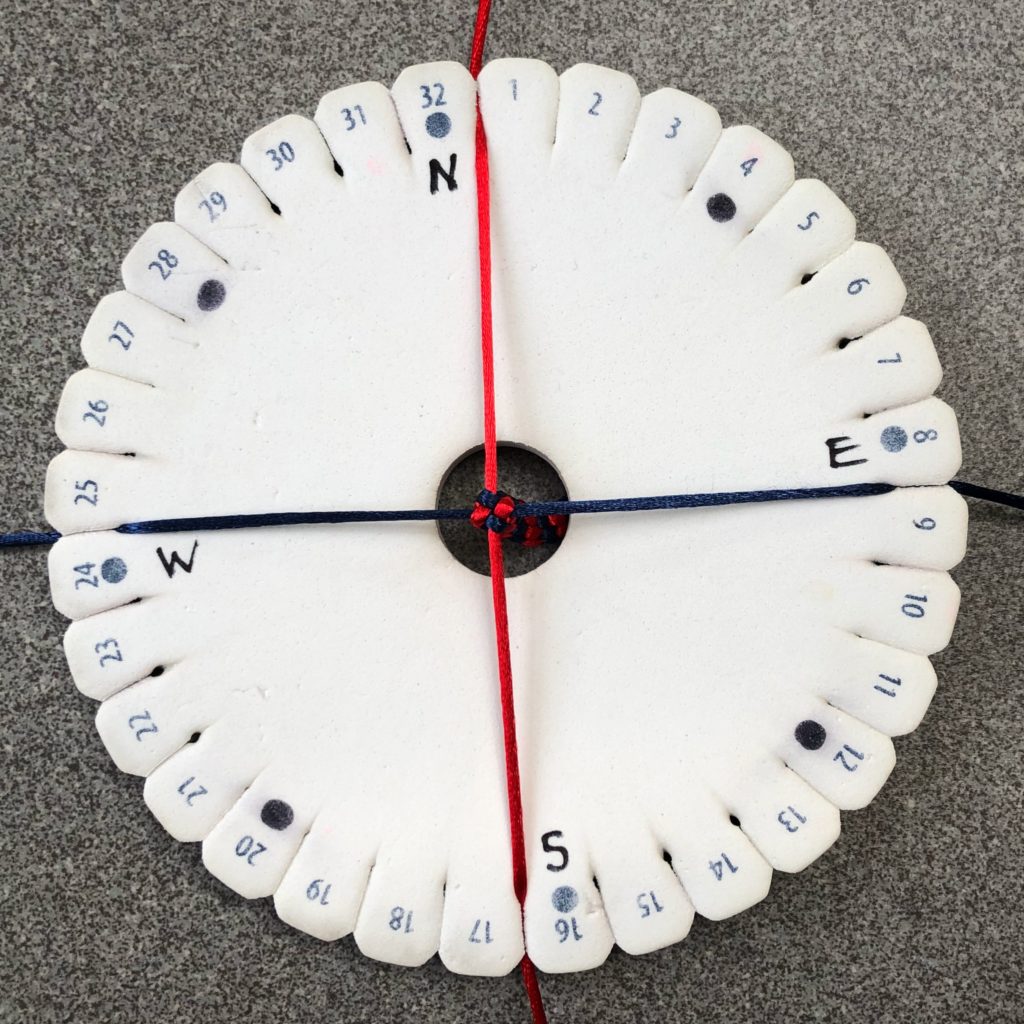
I recommend preparing the disk by marking the disk with N, S, E and west to mark the points of the compass. This will enable you to find your place and be consistent as you braid. This braid is made with 4 cords, which need to be much longer than you may be used to (thank you to Nancy Pikulik for pointing this out before I tried the braid!). For braids made with satin cord I suggest calculating the cord requirement at 4 times the finished length for each cord, and adding on 25cm/10inches to each cord. (The cord calculation is different for beaded braids) This will be more than you need, but it is more comfortable to work this braid with plenty of cord. Position the cords on the disk in the north, south, east and west positions. Attach a weight to the knot in the middle. I recommend 50g for 1mm cords and 75-100g for 2mm cords.
- Take the cord in the north slot without removing it from its slot and wrap it around your finger. Put the cord in the slot to the right of the north slot. Stretch the cord across the disk and put it in the slot to the right of the south slot.2.
- Turn the disk so that the east slot is at the top and repeat the action of wrapping the cord around your finger and putting it the slots across the disk.
- Turn the disk so that the south slot is at the top and repeat the action of wrapping the cord around your finger and putting it in the slots across the disk.
 4. Turn the disk so that the west slot is at the top. Wrap the cord around your finger and put the cord in the top slot as before. This cord needs to be laid over the first two cords and passed under the third cord. (An easy way to do this is to hold the cord as a loop, press on the disk with the thumb of the other hand, which will create a gap between the cord and the disk, and pull the loop through the gap)
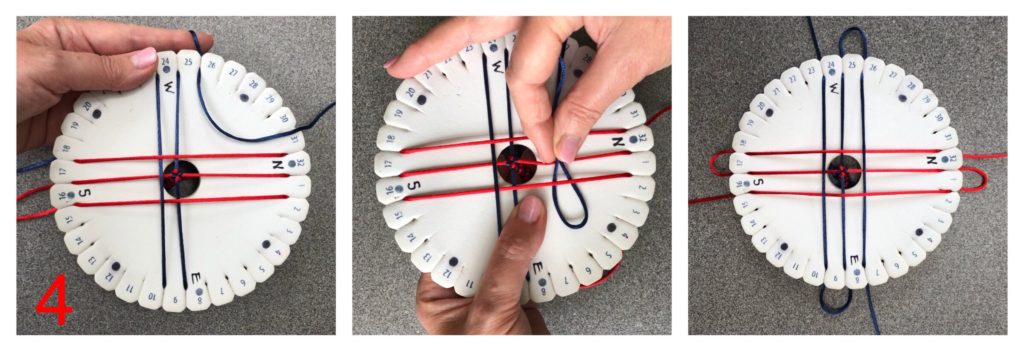 5. Turn the disk so that the north slot is back at the top. Lift the top loop out of the slots and pull on the cord in the bottom right slot until the loop is drawn close to the point of braiding.
6. Turn the disk so that the east slot is at the top. Lift the top loop out of the slots and pull on the cord in the bottom right slot until the loop is drawn close to the point of braiding.
7. Turn the disk so that the south slot is at the top. Lift the top loop out of the slots and pull on the cord in the bottom right slot until the loop is drawn close to the point of braiding.
8. Turn the disk so that the west slot is at the top. Lift the top loop out of the slots and pull on the cord in the bottom slot until the loop is drawn close to the point of braiding. 
9. The knot in the middle needs to be tight and even, so pull on the cords in opposite pairs to achieve this. Consistency in creating this central knot will ensure that the braid is regular and even. Practise makes perfect!
10. To ensure consistency, return the cords to their original slots, by moving them one slot to the right. The cords will be slightly twisted, so take this opportunity to untwist them by running each one between your thumb and finger before putting them in the slot. This is an important step because if the twist is allowed to build up it will adversely affect the tension of the braid.
11. Repeat all the moves from the beginning to create a beautiful box knot braid. Your first effort may be a little lumpy, but they will get better.
My next blog will show how to incorporate beads into this braid.